Windows Kernel Exploit Development - Setting Up The Environment
Hello Everyone! In this tutorial, I will walk you through setting up a kernel debugging environment in vmware workstation. Specifically, we will be targeting a vulnerable driver for kernel exploit development.
When you debug a usermode application (or attack a usermode application), if you crash the application you can just restart the app and debugger and everything will be fine. However with Kernel debugging, if you mess up or you overflow a buffer and cause it to crash, it will result in an operating system crash and, on windows, you will receive the famous blue screen of death, you will have to restart the device. For this reason, Kernel debugging is often done remotely to avoid losing progress of your work if you accidently - or in our case, intentionally - crash the kernel. So, for this reason, we will make two virtual machines, the debugger and the target.
Disclaimer: In this walkthrough series I will be using an x86 Windows 10, version 1703. There are several kernel mitigations present in this version that are worth being aware of as they will become relevant as the series progresses. The ones we will mainly be dealing with are kernel DEP and kernel ASLR.
Why windows 10 and not windows 11?
Windows 11 has something called VBS (Virtualisation Based Security), which is enforced by default (its also in Windows 10 but not enforced) and introduces a hypervisor that splits the system into two Virtual Trust Levels, VTL 0 (the normal operating system and kernel) and VTL 1 (the secure kernel and isolated user mode). Security decisions such as code integrity checks are made in VTL 1, which is isolated from VTL 0, meaning an attacker who compromises the normal kernel cannot tamper with these protections. Built on top of this architecture, HVCI (Hypervisor-Protected Code Integrity) enforces that all kernel-mode code must be signed, kCFG (Kernel Control Flow Guard) is also fully enforced on Windows 11, kCET (Kernel Control-flow Enforcement Technology) uses hardware shadow stacks to protect return addresses, and SMEP/SMAP prevent the kernel from executing or accessing user-mode memory. These mitigations are at the cutting edge of Windows kernel security and may be explored in later posts, but since I am very much still learning and already in the deep end, I won’t dive into the mariana trench just yet.
REQUIREMENTS:
Windows 10 ISO - since this walkthrough is a pre-requisite to future blog posts, I will be using an x86 Windows 10, version 1703 - You can download this here: https://www.getmyos.com/windows-10-1703-home-pro-education-32-64-bit-free-download
HEVD - An intentional vulnerable system driver - HackSysExtremeVulnerableDriver - this is what we will be targeting. https://github.com/hacksysteam/HackSysExtremeVulnerableDriver/releases
OSR load - Used to load the driver https://www.osronline.com/article.cfm%5Earticle=157.htm
WinDbg debugger - This is what we will use for kernel debugging, you can find the classic version of this in the Windows SDK, unselect everything apart from “Debugging tools for windows”: https://learn.microsoft.com/en-us/windows/apps/windows-sdk/ - or you can download the modern version from microsoft store.
Pykd - https://githomelab.ru/pykd/pykd
Mona & WinDbglib - https://github.com/corelan/windbglib
Vmware - You can use any hypervisor but I suggest using vmware to follow along with this.
SETTING UP THE ENVIRONMENT!
In this walk through we will use two virtual machines, for now we will only focus on setting up the first one.
Install the Windows 10 machine and name it debugger, download windbg onto this machine, you can also install IDA and python as I will be using that in further blog posts.
Now that you have your Windows 10 machine setup, we will setup an environment variable for Windows Symbols:
In the Windows start menu search bar type “Advanced system settings” –> Click Environment Variables –> New System variable.
Enter the following in the variable name and variable value:
_NT_SYMBOL_PATH
srv*https://msdl.microsoft.com/download/symbols
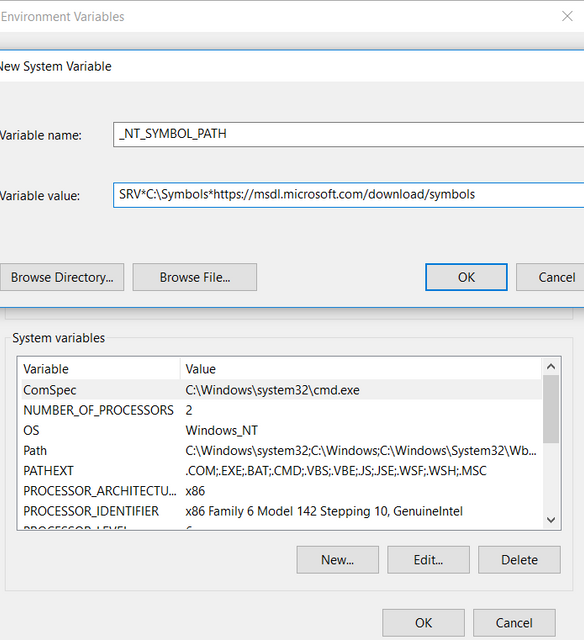
It shoud look like the above. Press ok and ok again and you can exit.
Now download pykd.zip from here https://github.com/corelan/windbglib/tree/master/pykd this zip contains two files - vscredist_x86.exe and pykd.pyd, you can leave vcredist.exe where it is for now, but pykd.pyd should be placed in the following directory:
C:\Program Files\Windows Kits\10\Debuggers\x86\winext\pykd.pyd <–
You can now run vcredist_x86.exe and follow the installer it should only take a few seconds.
Download mona.py https://github.com/corelan/mona Download windbglib.py https://github.com/corelan/windbglib
Once you’ve downloaded these two, move both mona.py and windbglib.py to the following directory:
C:\Program Files\Windows Kits\10\Debuggers\x86
You may come accross an issue with these 3 files when attempting to run them, because they’re “downloaded from the internet” they may have “protected mode” on, to be sure this isn’t the case, for pykd.pyd, mona.py, and windbglib.py, right click each one and select “properties” and mark it as safe manually.
To verify that all of this has worked correctly, type WinDbg in the start menu search bar and open it, in the top left of WinDbg go to:
File –> Open executable –> go to system32 and select calc.exe
Now calc should be loaded in the debugger. In the command window type:
.load pykd.pyd
!py mona modules
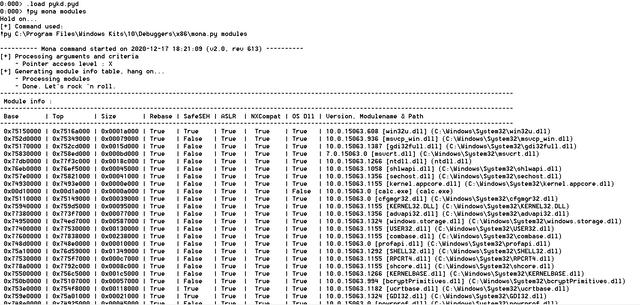
If all is working correctly, we are ready to set up the second VM - our target
SETTING UP THE TARGET
Create a new virtual machine with the same version, name it “target” - Windows 10 1703
Once target has Windows installed and has booted up, download and unzip the following:
HEVD - https://github.com/hacksysteam/HackSysExtremeVulnerableDriver/releases
OSR Loader - https://www.osronline.com/article.cfm%5Earticle=157.htm
Once you have downloaded these two, drag them to the desktop.
Now we will start OSR loader, go to WNET/i386/FRE/ and start OSRLOADER as an Administrator.
Click browse within OSRLOADER, select & load HEVD.sys from VULNERABLE/x86/HEVD.sys.
Now, click “register” –> and “start service”.
You should get a “The operation completed successfuly” message box.
Now let’s make sure that HEVD is loaded at startup everytime, so that when the kernel crashes or if something goes wrong, we don’t have to load it again.
Open cmd as Administrator and type the following:
sc config HEVD start=system
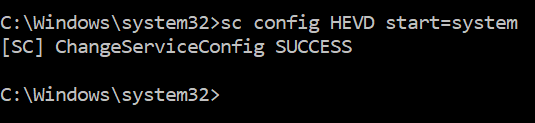
Now, minimize this machine and go back to the DEBUGGER machine, open cmd and type “ipconfig”
Copy the IPv4 address, now go back to the TARGET machine, and open a NEW CMD prompt as Administrator and enter the following:
bcdedit.exe /dbgsettings NET HOSTIP:192.168.x.x PORT:50000
Replace HOSTIP with the DEBUGGER VM IP that you just copied.
The output of this command should be a key, which we will use in windbg on the DEBUGGER machine to listen and receive a connection from TARGET.
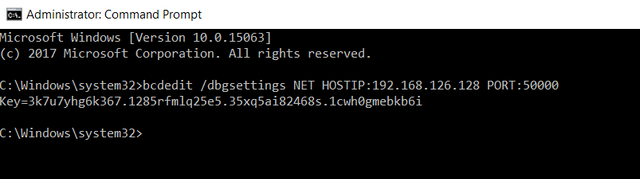
Now copy this key, and go back to your DEBUGGER machine, close WinDbg on the TARGET if it’s open still.
On the DEBUGGER machine: Open WinDbg –> in the top left, click file –> click Kernel Debugging -> Enter key and set port to 50000 –> click ok.
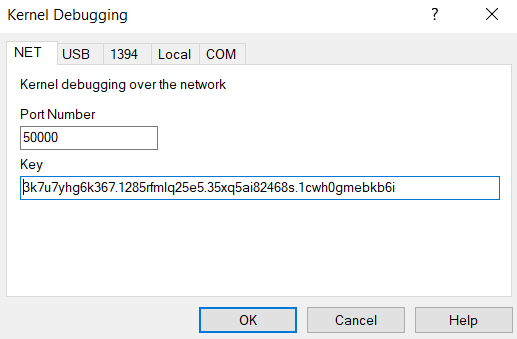
Okay, now WinDbg should be listening for a connection :) now we just need to make the TARGET windows start in debug mode, type the following in the TARGET machine command prompt:
bcdedit /debug ON
shutdown -r -t 0
When TARGET reboots, you should see a connection in WinDbg! Pause execution by selecting the “break” option, Debug –> break.
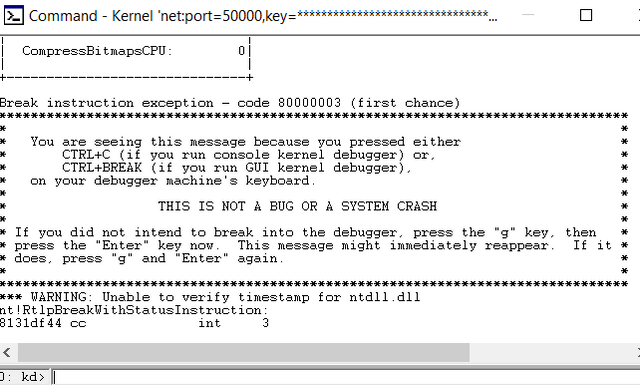
LETS VERIFY HEVD!
Now that we have a connection between the machines, we need to verify that HEVD has been loaded. Type in the debugger:
lm m H*
This takes the letter “H” and queries all modules that begin with it.
Now we just need to quickly Download HEVD on our DEBUGGER machine as we need to load the symbols.
https://github.com/hacksysteam/HackSysExtremeVulnerableDriver/releases
Once downloaded, enter the following commands in a command prompt, on the DEBUGGER machine:
mkdir C:\projects\hevd\build\driver\vulnerable\x86\HEVD\
cd C:\projects\hevd\build\driver\vulnerable\x86\HEVD\
Now copy HEVD.pdb to this directory, you will need to replace the user in the path with whatever your user is called:
xcopy C:\Users\size_t\Desktop\driver\vulnerable\x86\HEVD.pdb .
Use the “dir” command to check HEVD.pdb was copied.
Now, go back to WinDbg (DEBUGGER machine), and let’s check that the HEVD symbols have been mapped:
.reload
x /D HEVD!a
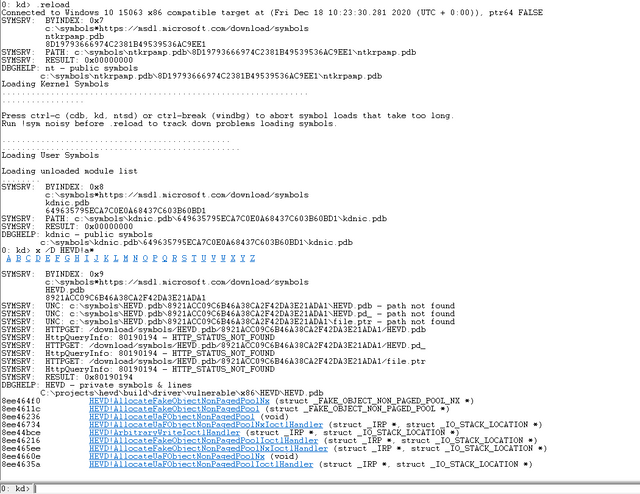
You should be able to see HEVD functions now, if you can’t then you need to make sure HEVD.pdb file is in the correct directory on DEBUGGER.
If you followed this and everything has gone well, you have now setup the debugging environment, and are ready to start debugging the TARGET! :)